 |
| 1st Grade: Apple Weaving |
 | |||
| 2nd Grade: Wacky [Wavy] Weaving |
What you need:
- 12x18in construction paper (this will be your "loom")
- 12x1in strips of construction paper (to weave with)
- scissors
- glue
- ruler
- pencil
Students will receive one of the three colors I created the apples with. I just used red, green and yellow but choose whatever colors you want! Students will then cut the outside line of the apple and the lines on the inside of the apple. You have to make sure you remind them HOLD ON THE FOLD (it rhymes so they usually remember it quickly). Stress that they stop on the line that's perpendicular to the cuts or else the weaving won't work. You can use the analogy that your scissors are a race car and the finish line is that perpendicular line but they have to stop right at the line.
Once students have completely finished cutting they can start to weave! I will be allowing students to get two strips at a time so they take their time and avoid ripping the paper while weaving. I'll be setting up strips of yellow, red, green and brown for fall. Just make sure that students select any color strips besides their main apple color. Then they will have a successful Apple Weaving!
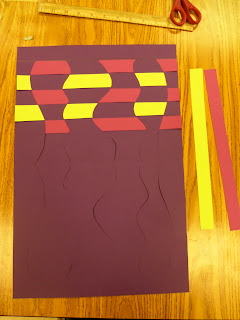
For the second grade Wacky {Wavy} Weaving you follow the same basic steps. There isn't as much prep by far for the second grade weaving though.
What you need:
- 12x18in color construction paper (your "loom)
- 12x1in color strips (to weave with)
- scissors
- glue
- pencil
- ruler
Once students have folded their paper in half, they will draw a line across the top of the OPEN part of the paper (farthest from the fold) about two inches from the top. This line is where the "race car" has to stop when students are cutting to make sure the weaving works. Then students will draw FIVE wavy lines from the fold to the line they just drew. When leading students to draw the lines, I will start with line number 3 and work my way out because students seem to pile all the 5 lines on one side of the paper or the other. Students then cut the waves making sure to stop at that top line. Students can write their name above that line as a reminder to not cut there as well.
Students unfold their paper after making all of the cuts and begin to weave. Again, I'll be allowing students to get two strips at a time to make sure they are woven properly. They can select whichever colors they want but try encourage students to use color from community in their weaving. For students that are finished early they can use the funky scissors to create vertical strips to add to their weaving.
I'd love to hear if you attempt this project either at home or with students! If you have any questions, throw them my way! Good luck & Happy Weaving!


Oh I JUST LOVE THIS!!!
ReplyDeleteI don't know WHY i just found out you have a blog-- but luckily for me, I did find out!
ReplyDeleteI can't wait to impress the kiddos I nanny with these projects next week-- thanks so much for sharing these great ideas!